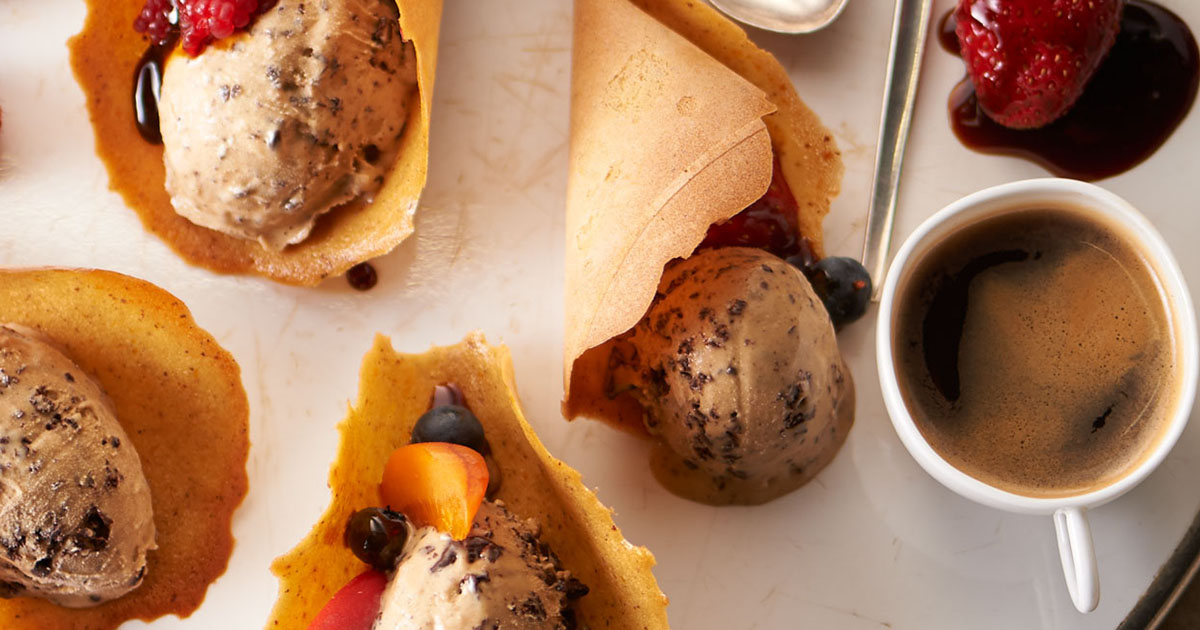
Coffee is most definitely a favorite morning beverage. But what if you had coffee for dessert as well? We have a recipe from Miele made with coffee and guaranteed to impress. You may not notice it right away, but coffee adds a rich depth to the flavor that your guests won’t soon forget. Give it a try: start and end your day with coffee.
Espresso-Stracciatella
Makes around 1 liter
Ingredients
- 50 g espresso beans
- 1 vanilla pod
- 300 ml milk
- 250 g whipping cream
- 6 egg yolks (from medium fresh, organic eggs)
- salt
- 100 g muscovado sugar (whole cane sugar, available from health food shops)
- 50 g glucose syrup (see tip)
- 3 tbsp cognac
- 80-100 g bitter coffee chocolate (espresso or mocha chocolate, at least 60% cocoa)
Directions
Place a wide, flat dish or ovenproof pan on the second shelf up from the bottom of the oven and preheat. Settings: Top / Bottom heat / 320°F.
Grind the coffee beans in a mortar, add to the hot pan, and roast for 13–15 minutes.
Slice the vanilla pod lengthwise and scrape out the seeds. Add the seeds and the pod, together with the milk and cream, to the coffee beans and bring to a boil on low heat. Then remove the pan from the burner immediately, cover, and leave the mixture to steep for 15 minutes.
Prepare a large bowl of iced water.
Place the pinch of salt, muscovado sugar, glucose syrup, and egg yolks in a bowl (a heat-resistant, round-bottomed mixing bowl is best) and whisk with a hand mixer. Place the bowl over a small saucepan of simmering water and beat until frothy. Pour the hot coffee and cream mixture through a sieve, stirring continuously, and continue to beat over the bain-marie until a creamy consistency is reached. Ensure that the mixture does not overheat (max 185°F), as this will make it runny again. Stand the bowl in the iced water immediately, and beat the cream until cold.
Stir the cognac into the cooled mixture and leave to freeze in an ice cream maker. Chop the chocolate, place in a small bowl, and melt over a bain-marie. Leave to cool slightly. Slowly pour the chocolate into the frozen ice cream mixture in a thin stream and stir.
Put the ice cream into a pre-chilled freezer box and keep in the freezer compartment until serving. Ice cream that has frozen too hard can be placed in the refrigerator for 10-20 minutes to soften before serving. Serve portions using an ice cream scoop or a tablespoon dipped in water and dish up with fruits in coffee caramel or in crispy tuiles (see recipe below).
Tips
- Ensure that no water gets into the melted chocolate, as this will dilute it and make it hard.
- Order glucose syrup over the internet, or make your own: Add 50 g each of glucose and sugar to 100 ml water, bring to the boil, and reduce to half the volume. Leave to cool. Any unused syrup can be stored indefinitely in a screw-top jar. Syrup that has hardened can be softened once more over a warm bain-marie.
- Serve the rest of the tuiles to nibble with the ice cream.
Crispy Coffee Tuiles
Ingredients
- 1 pack vanilla sugar
- 70 g caster sugar (granulated sugar)
- 1 pinch of salt
- 75 g flour (fine white flour)
- 1 serving soluble coffee (2 g instant coffee)
- 1 tbsp ground almonds
- 2 tsp finely grated organic orange zest
- 1 egg (medium)
- 80 ml milk
- 1 silicone baking mat
Directions
Place all the ingredients in a tall jug, whisk with a hand blender, cover, and leave to stand for at least 30 minutes. Prepare tumblers, a long-handled cooking spoon, and a rolling pin.
Preheat the oven. Settings: Top / Bottom Heat / 320°F.
Place the silicone baking mat on a baking sheet. Using a teaspoon or tablespoon, place small portions of the mixture onto the baking mat and spread them into very thin circles with the back of the spoon or a small palette knife. The circles of mixture will not expand and do not need much space between them. The thinner the mixture, the crispier the tuiles will be.
Bake the circles on the second shelf from the bottom for 12–15 minutes, until they are well browned around the edges.
Release the circles from the hot baking mat immediately using a palette knife. Either fold and press together to create little cones and stand each cone in a glass, or lay them in a gentle curve over a wooden spoon handle or rolling pin. Leave to cool and firm up. Continue with the rest of the mixture.
Tips
- Tuiles can only be baked on a silicone baking mat. Parchment paper is not suitable, as it creates creases.
- The baking mat should not be greased before use.
- The mixture can also be made without the instant coffee.
- To make cones, the circles should be 10–12 cm in diameter.
- Tuiles can only be shaped when they are warm.
- The cooled tuiles should be kept cool and dry until they are used.


